Support -> How to Synchronize your datedechoix.com Customer Database with your MailChimp account
How to Synchronize your datedechoix.com Customer Database with your MailChimp account
This guide will show you how to synchronize your customer database with your personal MailChimp account.
In order to import your contacts from datedechoix.com, you must log into your MailChimp account and create a list called datedechoix.com. Here's how:
Step 1. Click on "Create List"
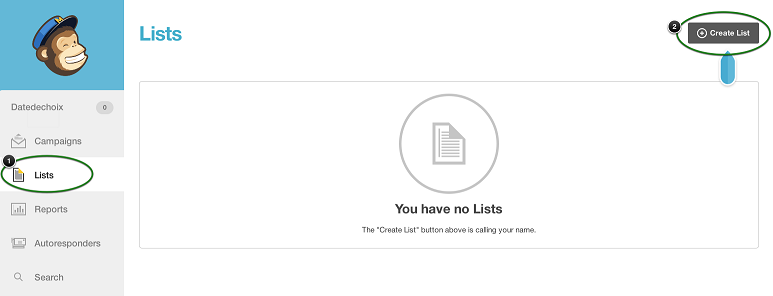
From the menu located on the left side of the page, click on "Lists". Next, click on "Create List" in the top right corner.

Step 2. Create Your List
Complete the fields within the form. Make sure to name your list "datedechoix". When you click "Save", you will see a confirmation box, and the name of your
list will appear below it. Please note there should only be 1 list in your MailChimp account called "datedechoix";
Step 3. Access List Settings
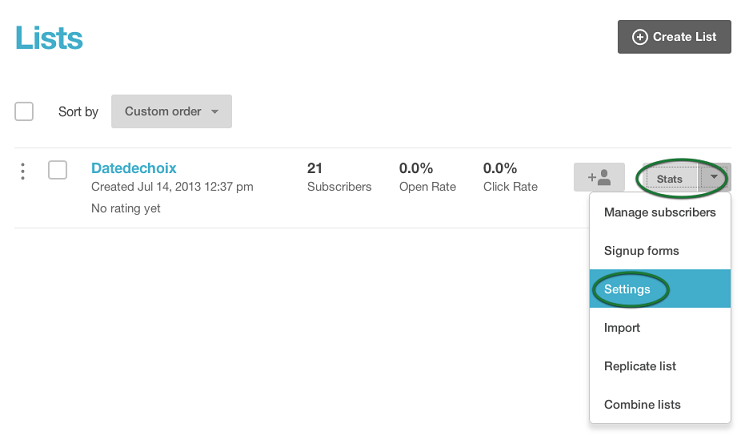
At the far right, click on "Stats" to make the drop down menu appear and select "Settings".

Step 4. Verify List Fields and Merge Tags
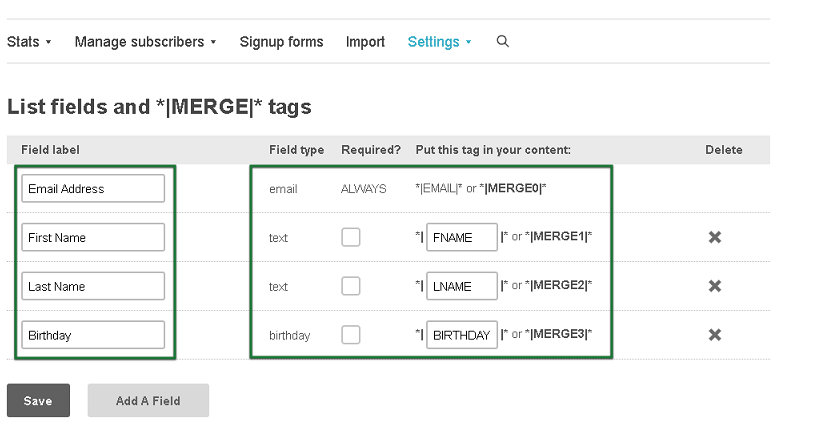
From the Settings menu, click "List fields and *|MERGE|* tags" and verify that the following appears:

By default, Email, First Name and Last Name should appear. You will have to add the Birthday field. To do this, click "Add a Field", complete the information and click "Save".
Step 5. Authorize datedechoix.com to access MailChimp
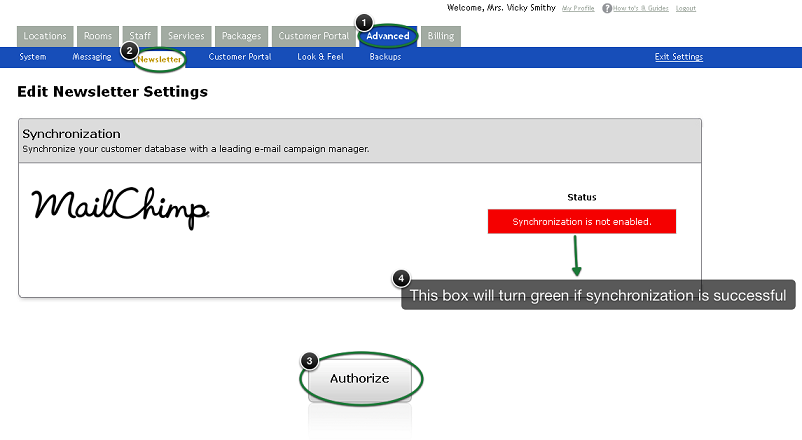
Log into your datedechoix.com account and go to Settings->Advanced->Newsletter module. Click the "Authorize" button.

You will then be redirected to a page on the MailChimp website that will ask
you to enter your username and password to confirm the authorization. Once this is done, datedechoix.com will
automatically complete an initial synchronization.
You will then see a message that will stipulate whether the synchronization was successful or not.
Note: Synchronization does not occur in real time. Synchronization occurs once daily
during the night. Therefore, changes to your datedechoix.com customer database throughout
the day shall be reflected the next day within your MailChimp account.
Step 6. Reconfirm your New List
MailChimp advises to reconfirm your new list prior to sending out your first MailChimp newsletter. This
is very important as it allows you to clean up your invalid e-mail addresses and acquire confirmation that your clients in fact wish to
receive your newsletters.
MailChimp offers some guides and best practices on this subject. Please take a look at the following MailChimp
support pages:
IMPORTANT
- A Webhook will be added to your list. DO NOT delete the Webhook and/or modify the Webhook parameters as this will cause synchronization issues. Webhooks are located in your MailChimp account under Lists->Settings->Webhooks.
- Do not delete the datedechoix.com list within MailChimp.
- Unsubscribes and invalid e-mail addresses WILL automatically be updated to your datedechoix.com customer database.
- New subscriptions and profile updates WILL NOT automatically be updated to your datedechoix.com customer database. Please be sure to update this information manually.
- MailChimp activity will be listed in your datedechoix.com account under Newsletter->Activity Logs.


